


.jpeg)

{{text-cta}}
Required Knowledge Level: Beginner
Tested on Kubernetes API version: 1.17-1.20
One of the best ways to tame the complexity around your Kubernetes clusters is by correctly leveraging labels on all your resources. There are lots of benefits to using labels and we’ll try to touch on most of the big ones in this article.
TL;DR Here are some of the most common use cases that leverage labels:
- Gluing Resources Together
- Cost Allocation
- Service Ownership
- Doing Canary Deployment
- Debugging and Bulk Operations by Label
We’ll go through these one at a time, but first, let’s cover some of the basics.
What are labels
Labels are nothing more than custom key-value pairs that are attached to objects and are used to describe and manage different Kubernetes resources. Labels can be used by both Kubernetes and homo-sapiens to organize and to select subsets of objects. When dealing with Kubernetes config files, labels are always added under the “metadata” section of the manifest.
Labels vs annotations
Annotations are also key-value pairs that are attached to objects and are used to describe Kubernetes resources. Unlike labels, annotations are not used to identify and select resources.
You may want to check out the Kubernetes docs for some examples of when to use annotations. For example, you may want to use annotations to include phone numbers or emails of people responsible for specific objects.
What are selectors?
A label selector is just a fancy name of the mechanism that enables the client/user to target (select) a set of objects by their labels.
It can be confusing because different resource types support different selector types - `selector` vs `matchExpressions` vs `matchLabels`:
Newer resource types like Deployment, Job, DaemonSet, and ReplicaSet support both `matchExpressions` and `matchLabels`, but only one of them can be nested under the `selector` section, while the other resources (like “Service” in the example above) support only `matchLabels`, so there is no need to define which option is used, because only one option is available for those resource types.
Now that we know what labels and selectors are, let’s talk about what you (and Kubernetes) need them for - basically, there are two main reasons:Why to use labels?
1. Because you must
Remember that we said that labels can be “used by Kubernetes”? With labels, Kubernetes is able to glue resources together when one resource needs to relate or manage another resource. For example: a Deployment that needs to know how many Pods to spin-up or a Service that needs to expose some Pods:
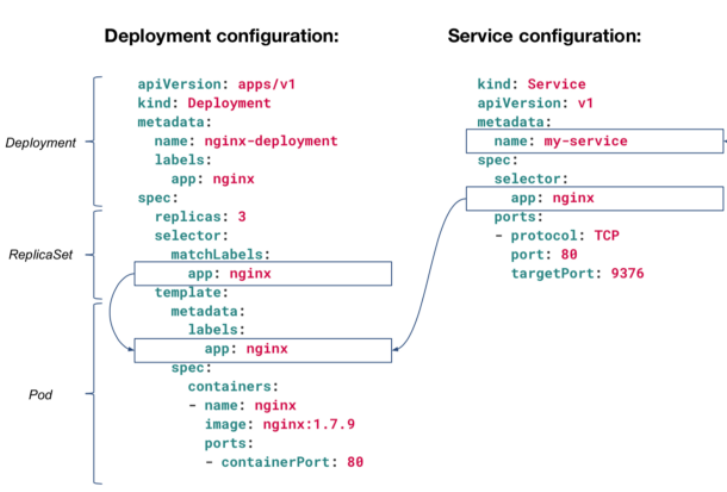
This Deployment configuration will spin-up 3 Pods (replicas: 3) and will monitor to make sure it always has 3 Pods alive. How will it target those Pods? By their app: nginx label. The same goes with the Service configuration that is targeting Pods with the label app: nginx. Any Pod without this label, will not be exposed through this Service (“my-service”). This is why you must configure labels correctly or Kubernetes will not work as you expect it to.
2. Because you want
Now that we’ve covered why Kubernetes need labels, let’s cover some use cases that will explain why you want to leverage labels for easy management of resources.
Allocating Costs
You can add labels based on team or budget segment to distinguish resources owned by different teams.
For example: Let’s say you’re the Head of DevOps and are in charge of reporting back to management on this month’s server costs. As mentioned, a label is simply a custom property on a resource, so you could get away with simply adding a custom team property to your YAML file like team: research or team: analytics.
The ability to properly attribute costs & confidently report back to management can be absolutely critical when your cloud costs add up 😉. But, aside from just understanding how much each team is spending, it’s very possible that you’re operating within a fixed budget for these resources, so you may also want to set up alerts if one team is flying high above budget early in the month.
Ownership
Labels are great not only for financial ownership, but they are also useful for operational ownership. Consider the following scenario - while debugging, you want to talk with the engineer that is responsible for one of the services that you’re trying to debug.
How do you find out who it is? Well, consider adding labels to your deployments with the name, email alias, or Slack channel of the team responsible for each service. This will make it easier to alert the relevant team or team member.
Canary deployment
The best way to test your release is on real traffic but you also don’t want to take a chance that a new release will break production. Therefore, canary deployment is a neat way to leverage labels so you can roll out releases to a small subset of servers or users to test a new release on live traffic, and then (if everything goes smoothly) roll out the release on all the servers so it serves all the traffic.
{{text-cta}}
Bulk operation - filter by label
Now that we understand that labels can help you selectively filter kubectl outputs to just the objects you need (e.g. by env, version, etc.), let’s review some examples.
Equality-based selector
Everybody knows the classic:
This will give you data on all your Kubernetes Pods. But, what if you only want to get the pods where env:production? If you’ve set your labels correctly, then it’s as easy as:
Or if you want to get all the Pods that are not on your testing env (env:testing) you can do:
Set-based selector
Now let’s say you want to perform a more complex filtering operation like deleting all the pods that are not owned by team “frodo” or “gandalf”
Or the opposite - delete all the pods that are owned by team “frodo” or “gandalf”:
To delete all the pods with the label key “owner-team” (no matter what the values are):
Or the opposite - delete all the pods without the label key “owner-team” (no matter what the values are):
Other selectors
Regex patterns and SQL queries are not supported by the selector API, but there are some workaround solutions that can help you achieve the same functionality - you can use AWK to perform regex-like or JSONPath to perform SQL query-like selector filtering.
Labels restrictions
You can apply any and as many labels as you like, but remember:
- Labels key and value pairs are case sensitive
- Label key and value pairs must begin and end with an alphanumeric character ([a-z0-9A-Z])
- Labels key and value pairs can contain only special characters such as dashes (-), underscores (_), dots (.)
- Label key can’t be empty while a value can
- Label key supports optional prefix, separated by a slash (/)
- Label key (w/o prefix) and value must be 63 characters or less
Standard Kubernetes labels
By default, every Kubernetes Node comes with the following pre-populated labels:
- kubernetes.io/arch (e.g. kubernetes.io/arch=arm64)
- kubernetes.io/os (e.g. kubernetes.io/os=linux)
- kubernetes.io/hostname (e.g. kubernetes.io/hostname=ip-172-85-189-120.ec2.internal)
- node.kubernetes.io/instance-type (e.g. node.kubernetes.io/instance-type=m3.large)
- topology.kubernetes.io/region (e.g. topology.kubernetes.io/region=us-east-1)
- topology.kubernetes.io/zone* (e.g. topology.kubernetes.io/zone=us-east-1c)
*this label is also applied by default on PersistentVolume
It is possible to create pods that will get scheduled on specific nodes by defining the `nodeSelector`:
Kubernetes labels best practices
- Adopt a labeling strategy - labels need to be consistent across all the resources or it will just not work properly. If some Pods have the label “owner-team” and some have “owner_team” it will just make it harder for everyone to leverage labels.
- Leverage CI Automation Tools (like Datree 😎) - Having a labeling strategy is great in theory, but if no one’s following your conventions, what’s it really worth? Sometimes it feels like: no matter how many email blasts you send out ccing the entire dev team - some engineers simply forget. Don’t get mad. Get Automated. Tools like Datree allow Dev Leaders to enforce specific conventions for every push & pull request.
- Always manage labels via code - yes, I know, it’s easier to update / apply / delete labels with kubectl but that should only be done as a hotfix (and then also changed accordingly in the code). Otherwise, the next time that your Kubernetes configuration is deployed, it will override any changes you made manually via the CLI
- Take the Kubernetes recommended labels with a grain of Salt - Even though the official Kube Team is awesome and provides an official convention for labels, don’t look at these conventions as the “perfect labeling strategy” and force it upon your organization if it doesn’t make sense in your case. Instead, use it as inspiration for your own labeling convention.
- Add a prefix (when necessary) to avoid naming conflicts - labels without a prefix are private to users. The shared prefix ensures that shared labels do not interfere with custom user labels. Much like how you wouldn’t want to ‘pollute the global namespace’ in any codebase, adding a prefix to your labels can also help you & your team avoid naming conflicts today & in the future.
Wrap Up
Using labels appropriately positions you & your team to stay organized with your resources. You should think about your labels as the opportunity for you and your team to easily reason about your Kubernetes architecture. Don’t be afraid to create declarative config files! When it comes time to query those resources, you’ll be glad you did.
Learn from Nana, AWS Hero & CNCF Ambassador, how to enforce K8s best practices with Datree

Headingajsdajk jkahskjafhkasj khfsakjhf
Lorem ipsum dolor sit amet, consectetur adipiscing elit. Suspendisse varius enim in eros elementum tristique. Duis cursus, mi quis viverra ornare, eros dolor interdum nulla, ut commodo diam libero vitae erat. Aenean faucibus nibh et justo cursus id rutrum lorem imperdiet. Nunc ut sem vitae risus tristique posuere.

%20(1).webp)
.png)
.png)


